How to make a nebula
Welcome to the first devlog for Gravity Ace! My plan is to give you a look behind the scenes. You’ll have a front row seat to see the decisions I’m making and why I’m making them. And you’ll get a sneak peek at new features I’m working on and how development is progressing overall (no spoilers!).
Some of the devlogs will talk about new features or why something was added or removed. Some, like this one, will be more technical. But I want to make these interesting for everyone so I’ll do my best to explain things in a way that you don’t need a computer science degree to understand.
With that… let’s jump into what I wanted to talk about today: beautiful stars and nebulae. When you’re making a space game, you need a pretty space background, right? Here’s what I have so far:
I think it looks pretty cool. The surprising thing is that this is made from just four static images (and a bit of math).
There’s a background color, the stars, and two hand drawn noise images for the clouds. Every frame, many copies of those images are overlayed on top of each other, scaled, offset, and colored to create what you see above. The layering is what creates the parallax effect where closer objects seem to move faster than objects farther away. Some of the layers are used to add color and some of the layers are used to subtract color. Which leads to a final layered image that doesn’t have any obvious repeating patterns. And all of that layering and transforming is done on the graphics card so that it runs super fast.
IMPORTANT NOTE! I am teaching myself shader programming. It’s difficult and I’m not very good at it! I’m just bashing away until I get a result I like.
I’m building this game with Godot Engine but the technique will work with any engine. Here’s how it’s setup in Godot:
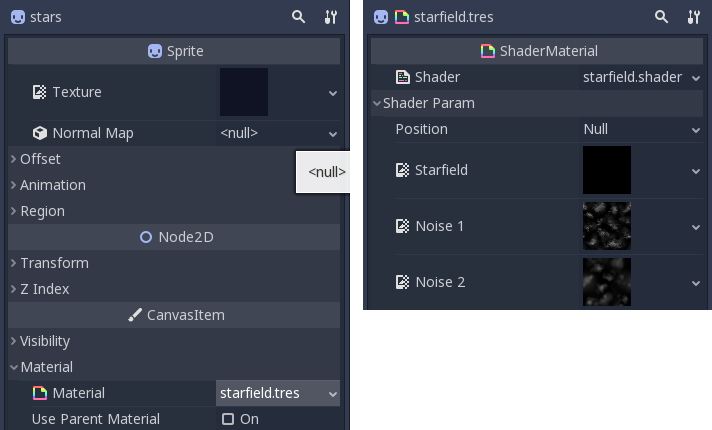
A single sprite node with a background texture and a shader material
The background moves based on the player position so the position must be passed into the shader as a uniform. The stars and noise are all black and white with an opaque black background. The black background lets you sample the texture multiple times and keep adding the result back to itself. Modify the UVs by multiplying them with a constant to scale, adding an offset, and adding the position multiplied by another constant to determine how quickly that layer will move.
...
// Here, 1.0 is the scale, 0.5 is the parallax speed, for the first layer
starfield_uv = uv * 1.0 + position * 0.5;
stars = texture(starfield, starfield_uv);

// ...again
// The final vec2 is an arbitary offset
starfield_uv = uv * 1.05 + position * 0.4 + vec2(0.5, 0.3);
stars += texture(starfield, starfield_uv);
...
The same thing is done to build up the cloud layers and add colors:
...
noise_uv = uv * 1.3 + position * 0.3;
neb += texture(noise1, noise_uv).rgb * vec3(0.5, 0.0, 0.0) // red;

noise_uv = uv * 1.3 + position * 0.4 + vec2(0.3, 0.1);
neb += texture(noise2, noise_uv).rgb * vec3(0.1, 0.1, 0.3); // dark blue
...
Finally, the shader outputs a combination of the background color, stars, and nebula clouds:
COLOR.rgb = COLOR.rgb + stars.rgb + neb.rgb;You can play around with different values for a long time before you find something that looks and feels right. It took me several days to get a result I was happy with and I’ll probably tweak it some more before the game ships.
Published December 14, 2018