Happy Trails in Godot Engine

Line trails
Transcript:
Hey everybody and welcome back to the video devlog for Gravity Ace.
So a few of you asked me last time: “How do you make those line trails behind bullets and the ship?” I’ll show you in this video along with code and an explanation of how it all works.
BUT FIRST! I’ve been feeling a tiny bit burnt out… well, burnt out is the wrong word. It’s more like, you know, I’ve been working on this game for a long time. And when you work on a game – or any long-term project – you’re excited to do all this fun stuff at the beginning. But then you run out of fun stuff to work on and you reach a stage where you just need to execute. You know, like, the creative part is done, all the big decisions have been made, and now you just need to MAKE IT. You’ve heard this before but it’s totally true: STARTING a game is pretty easy but FINISHING a game is HARD.
So I entered a game jam yesterday. Let me first say that JAMS ARE GREAT because they teach you how to go through the entire process of making a game from start to finish. The short time – this one was 12 hours – requires you to learn important skills like becoming proficient with your tools, CUTTING SCOPE, learning to make pragmatic decisions. Those are super important skills if you want to FINISH a game in a reasonable amount of time and those lessons are ESPECIALLY important for beginners. So I don’t participate in jams much anymore because I feel like I’ve learned those lessons already, like, they’re seared into my deepest nooks and crannies. And I think there are less painful ways than jams to come up with good ideas. But I had an itch to do something creative and ship something so I joined and it was just what I needed. Go look at ITCH IOs game jam calendar if you’re looking for a jam.
I’ve also been playing JUPITER HELL out now in STEAM EARLY ACCESS. I grew up with DOOM and this game captures it’s essence in a TURN-BASED ROUGELIKE. It’s great, I totally recommend it.
OK! LINE TRAILS. Here’s what they look like in Gravity Ace. I use them mainly on the ship and bullets to increase visibility and to give them a sense of speed and because they just LOOK COOL.
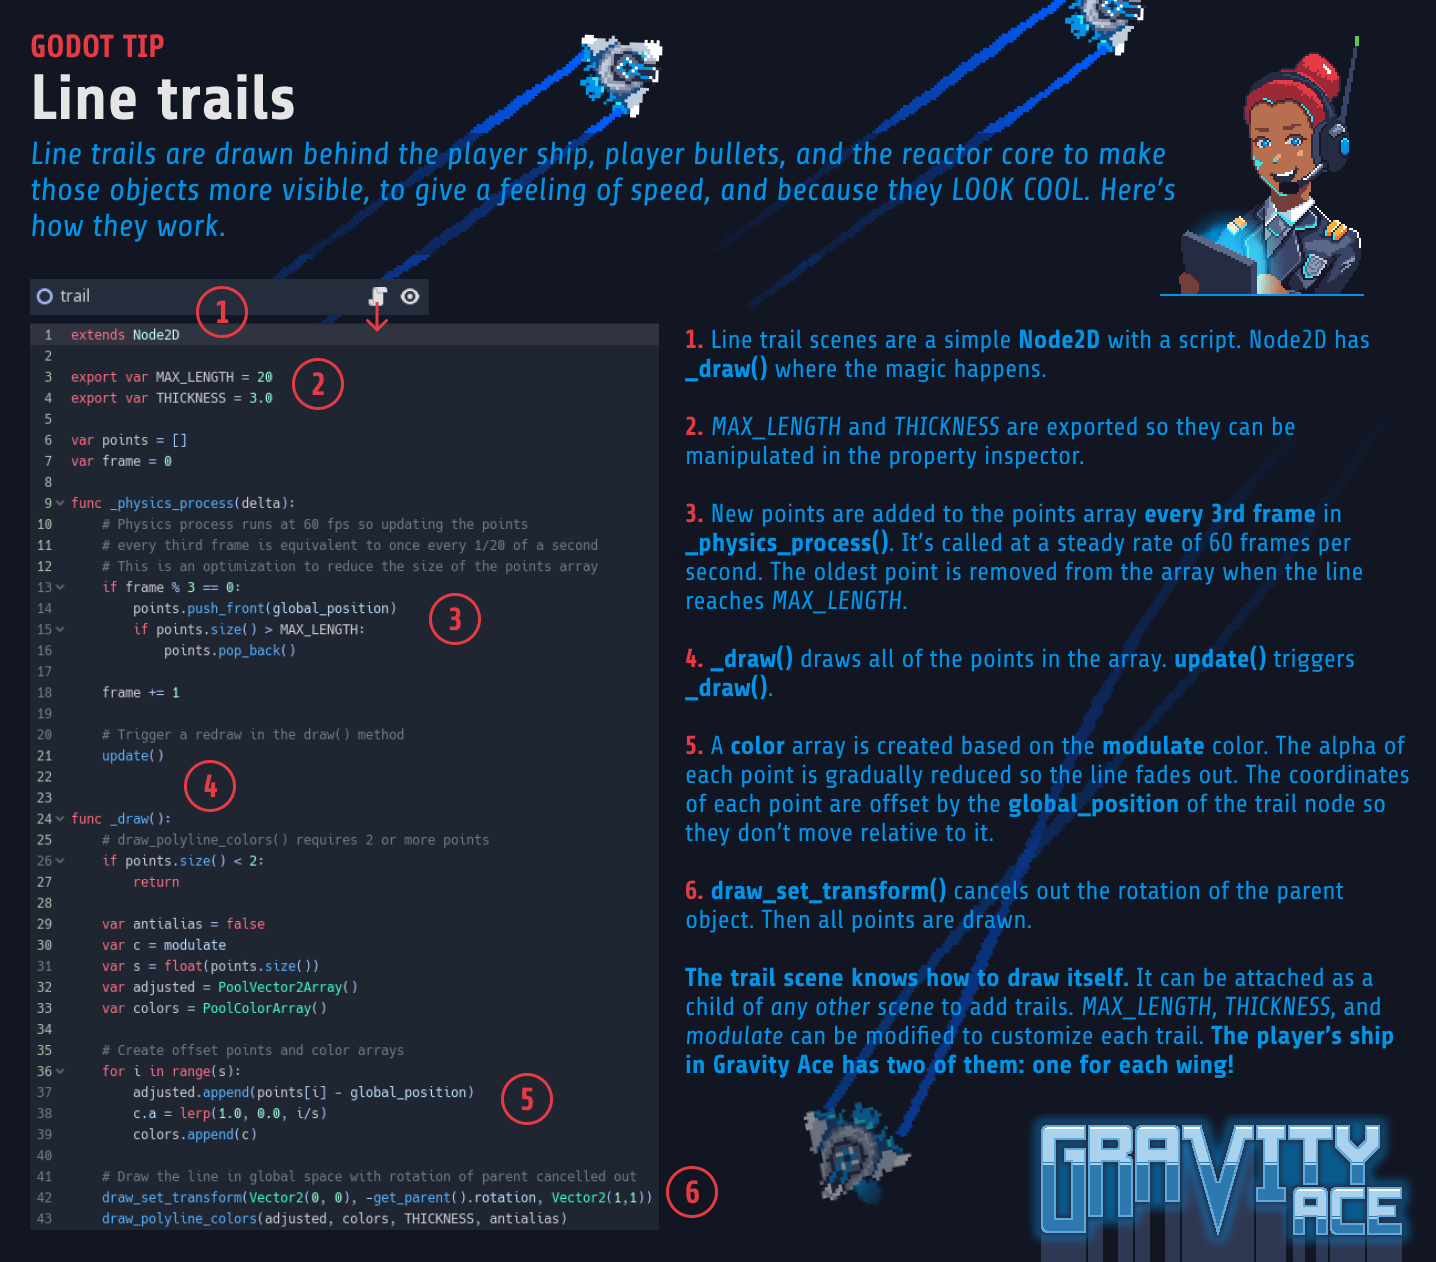
Here’s the setup. The trail scene is a lone Node2D with a script. By itself a Node2D doesn’t show anything on the screen. But all Node2Ds let you use basic 2D drawing functions to draw on the screen. Let’s look at the code.
First, I export a few variables for LENGTH and THICKNESS. I’ll use those later. They’re EXPORTED so that they appear in the property inspector.
Next I setup an array to hold all of the points I want to draw the line trail through and a variable for counting frames.
Then in _physics_process() I start recording global positions. Every third frame I store the current global position of the Node2D in the array. If you’re doing this type of sampling you should ALWAYS do it based on TIME and not frames because frame rate is variable. I only get away with it here because _physics_process() ALWAYS runs at 60 FPS. If you did it in _process() your trail would be shorter or longer depending on the frame rate.
If the array is at its maximum length then I remove the oldest point. Then I call update() every frame which triggers the node to redraw itself in the draw() method.
In draw() I’m using a method called draw_polyline_colors() that can draw all of the points in one go. That method requires 2 or more points so I return immediately if there aren’t that many in the array. Then I loop through the points and adjust each one by subtracting the current global position of Node2D. This is imporant otherwise the trail would move with the Node2D instead of living in global space. I also create an array of colors where I adjust the alpha of the modulate property based on the index of the current point so that the line fades out towards the end.
Finally, I set the draw transform so that the rotation of the parent is cancelled out and then draw the line.
Using it is simple. I just instance it in whatever parent scene I like, adjust its color length thickness, and it knows how to draw itself.
Godot has a node called Line2D that would simplify some of this. You’d still need to sample the points but I think you could probably remove the _draw() method completely and adjust the rotation and position of the Line2D each frame. Should work the same. When I started this project I didn’t know Line2D existed so this is what I came up with and performance is fine so I have no reason to rewrite it now.
Let me know in the comments if you have any questions or tips you want to share. Also, please go to GRAVITY ACE DOT COM where you’ll find my Steam and Itch links where you can follow and wishlist the game.
Have a happy Christmas and New Year. I hope you get to spend some time with people who love you. Thanks and see you next time!
Published December 22, 2019
